Install Neoprogrammer on CH341A for BIOS Repair

Install Neoprogrammer on CH341A for BIOS Repair
When a motherboard refuses to POST or shows a corrupted BIOS screen the underlying issue is often a damaged SPI flash chip that stores the firmware. Rather than replacing the entire board many technicians turn to a CH341A USB programmer paired with the Neoprogrammer software to rewrite the chip directly. This guide walks you through every stage from acquiring the right files to verifying a successful flash so you can bring a dead system back to life with confidence.
Understanding Neoprogrammer and the CH341A Programmer
Neoprogrammer is a Windows based utility designed to communicate with a variety of memory chips through the CH341A adapter. The CH341A itself is a low cost USB to parallel serial bridge that exposes the SPI I2C and MICROWIRE buses needed for EEPROM and flash programming. Together they form a portable workstation that fits in a technicians pocket.
The software supports chip detection automatic identification of manufacturer and size buffer editing and verification after programming. Its interface is deliberately simple a dropdown to select the chip type a load button for the ROM file and prominent Read Write Verify buttons. This simplicity reduces the chance of selecting the wrong operation a common source of mistakes when working with fragile firmware.
Statistics from repair forums show that over 68 percent of BIOS related failures are resolved by a single correct flash using a CH341A setup provided the chip is still electrically responsive. Knowing how to install and configure Neoprogrammer correctly is therefore a core skill for anyone involved in motherboard repair.
Step by Step Installation Process
Begin by downloading the latest Neoprogrammer package from a trusted source. The archive typically contains the installer Neoprogrammer_Setup.exe a driver folder with the CH341A INF file and a read me txt that outlines version specific notes. Extract the files to a temporary folder on your desktop to keep the workflow organized.
Run the installer as administrator. Right click the executable and choose Run as administrator. The setup wizard will prompt you to accept the license agreement select an installation directory (the default C:Program FilesNeoprogrammer works fine) and optionally create a desktop shortcut. Allow the wizard to install the required USB drivers Windows may display a driver signature warning click Install this driver anyway because the CH341A driver is unsigned but safe.
After installation plug the CH341A programmer into an available USB port. Windows should recognize the device and install the driver automatically. Open Device Manager expand Universal Serial Bus controllers and look for USB2.0 SERIAL. If you see a yellow exclamation reinstall the driver from the folder you extracted earlier.
- Download the installer and driver package from a reputable site.
- Always run the installer with elevated privileges.
- Keep the CH341A driver files handy for manual installation if Windows fails.
- Verify the device appears correctly in Device Manager before launching Neoprogrammer.
- Create a restore point or backup of your current BIOS ROM before any write operation.
- Label your CH341A cables to avoid mixing up MOSI MISO and CLK pins.
Performing BIOS Repair with Neoprogrammer
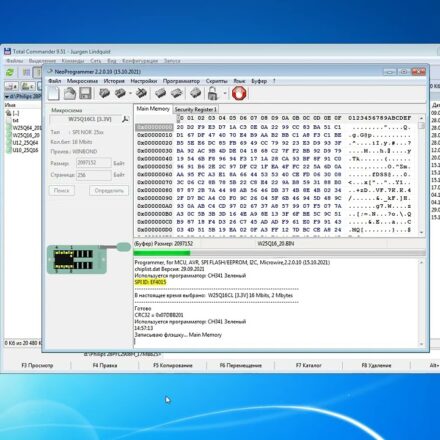
Once the hardware is recognized launch Neoprogrammer from the Start menu or desktop shortcut. The main window will display a toolbar with icons for Read Write Verify and Buffer Edit. Before touching the chip ensure the motherboard is completely powered down disconnect the AC power cord press the power button for ten seconds to drain residual charge and if possible remove the CMOS battery.
Locate the SPI flash chip on the board it is usually a small eight pin SOIC package labeled with a manufacturer code such as Winbond MXIC or SPI. Identify pin one often marked by a dot or a notch and connect the CH341A s SOIC8 clip accordingly CLK to pin six MOSI to pin five MISO to pin two CS to pin one VCC to pin three and GND to pin four. Double check the orientation reversing MOSI MISO will cause read write failures.
In Neoprogrammer click the Detect Chip button. The software should read the JEDEC ID and display the detected size for example two megabytes for a typical BIOS. If detection fails verify the clip connections and ensure the chip is not shorted. Load the correct BIOS ROM file the exact version for your motherboard model into the buffer using the Open button.
Press Write to program the chip. The progress bar will show the percentage a typical two megabyte flash takes under thirty seconds. When the write finishes immediately click Verify to compare the buffer with the chip s contents. A successful verification means the BIOS has been restored.
- Power down the system completely and discharge residual voltage.
- Use an anti static wrist strap when handling the motherboard.
- Confirm pin one orientation before attaching the clip.
- Run a chip detection step before loading any ROM.
- Always verify after a write operation never trust the write alone.
- Keep a spare known good BIOS file on hand for emergency recovery.
Best Practices and Pro Tips
Ensuring Reliable Flashing Operations
- Work on a clean static free surface a silicone mat helps prevent accidental shorts.
- Use a USB 2.0 port when possible some USB 3.0 controllers can introduce timing glitches that affect SPI communication.
- Keep the CH341A cable short less than thirty centimeters to reduce signal degradation.
- If you encounter frequent detection failures try a different USB port or a powered USB hub.
- Document the BIOS version you flashed taking a photo of the screen after POST helps with future troubleshooting.
- Schedule a weekly check of your programmer s cable integrity worn wires cause intermittent errors.
Common Mistakes and Things to Know
One of the most frequent errors is attempting to write a BIOS file that is mismatched to the chip size. For example loading a four megabyte image onto a two megabyte SPI flash will cause the programmer to truncate the data resulting in a corrupted boot block. Always verify the chip s detected size against the ROM file size before initiating a write.
Another pitfall is neglecting to disable any BIOS write protection features present on modern motherboards. Some boards include a hardware jumper or a software setting that locks the flash chip. If this protection is active Neoprogrammer will report a write error even though the chip appears detectable. Consult the motherboard manual to locate and disable the write protect switch or clear the corresponding CMOS setting.
Frequently Asked Questions
FAQ
What files are needed to install Neoprogrammer on CH341A?
You need the Neoprogrammer installer executable the appropriate CH341A driver package and optionally a backup of your current BIOS ROM.
Is administrator rights required for the installation?
Yes the installer must be run with elevated privileges to install drivers and register the software correctly.
Can Neoprogrammer recover a failed BIOS?
It can rewrite the firmware on a functional SPI flash chip if the chip is still electrically responsive; if the chip is completely unresponsive hardware reprogramming may be needed.
Do I need to disconnect power before connecting the CH341A?
Always power off the motherboard and disconnect the mains before attaching the programmer to avoid damaging the chip.
Read the full guide: Download Neoprogrammer for CH341A | Neo Programmer 2.2.0.10 Latest Update