Turn Your Old Android Tablet into a DIY Android Auto Head Unit with Headunit Revived
Give Your Old Tablet a Second Life {#introduction}
Old tablets are great for binge-watching the latest Netflix series, but that’s not the only way to put them to good use. If you drive an old car without a modern infotainment system, one of the best ideas for repurposing your old Android tablet is to set it up as a DIY Android Auto head unit.
For this project, all you need is one app: Headunit Revived. It’s an open-source app that acts as an Android Auto receiver, similar to the built-in dashboard display on modern cars. It works the same way—connect your Android phone to the head unit via a USB cable or Wi-Fi/Bluetooth, and you’ll be able to navigate with Google Maps, play music via Spotify, and access other essential apps like Facebook Messenger and Google Calendar.
This means you won’t have to buy an expensive head unit for your car. Just set it up with an old Android tablet running Headunit Revived.
What Is Headunit Revived? {#what-is-headunit-revived}
Headunit Revived is an open-source Android app that turns an Android tablet or phone into an Android Auto receiver. It’s available on both Android tablets and phones, as long as the device is updated to at least Android 4.1.
| Platform | Availability | Price |
|---|---|---|
| Android (Play Store) | ✅ Yes | One-time fee of $4 |
| Android (GitHub APK) | ✅ Yes | Free (manual installation) |
| Amazon Fire Tablet (Amazon Appstore) | ✅ Yes | One-time fee of $4.70 |
If you’re comfortable with sideloading, you can download the APK for free from the project’s GitHub page. The paid version supports the developer and provides automatic updates.
What You’ll Need {#what-youll-need}
Before you start, gather the following:
| Item | Purpose |
|---|---|
| Old Android tablet or Amazon Fire tablet | Runs Headunit Revived as the display. |
| Android smartphone | Provides Android Auto functionality. |
| USB cable (for wired connection) | Connects phone to tablet. |
| Wi-Fi/Bluetooth (for wireless connection) | Enables wireless Android Auto. |
| Tablet car mount | Secures the tablet in your vehicle. |
Set Up Headunit Revived on Your Old Tablet {#setup-headunit-revived}
Before connecting your Android phone to your tablet, you need to set up Headunit Revived on the old tablet first.
Step-by-Step Instructions
-
Install the app from the Google Play Store, Amazon Appstore, or GitHub APK.
-
Open Headunit Revived and allow the necessary permissions (location and audio recording).
-
Tap I Understand and Agree on the Safety & Liability page.
-
Select Start on the Quick Setup Wizard.
-
Choose your tablet’s screen size. If you’re unsure, check your tablet’s specifications online.
-
Select your device orientation. Landscape is recommended, as it’s the default orientation of regular Android Auto head units (portrait mode can cause issues with Google Maps).
-
Apply the optimization settings.
Headunit Revived will automatically optimize the Android Auto layout based on your tablet’s screen size and preferred orientation. You can adjust these settings later from the app’s Settings section, including:
-
Enabling right-hand drive
-
Adjusting UI scaling
-
Choosing when to turn on auto dark mode
-
Changing screen resolution
There’s also an option to set up automation, where Headunit Revived automatically launches and connects depending on certain conditions.
Wired Connection: USB Setup {#wired-connection}
Between the two connection options (wired and wireless), wired is easier to set up and generally more reliable.
Step-by-Step Instructions
-
Connect your phone to your tablet using a suitable USB cable.
-
On your phone, open the USB notification in your Notification Panel.
-
Under USB controlled by, select This device (you may need to verify your identity via biometrics or a password).
-
Set “Use USB for” to Transferring files/Android Auto.
-
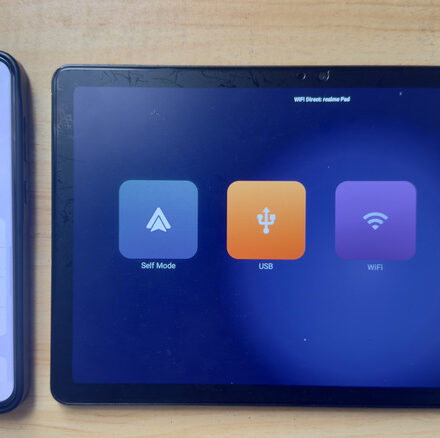
On the head unit (your tablet), launch Headunit Revived.
-
Tap on USB.
-
When prompted, allow the app to access your connected phone.
-
Choose Headunit Revived as the app.
-
On your phone, hit Continue to proceed with launching Android Auto.
Troubleshooting: If you run into connection issues like the tablet failing to recognize the phone, try switching to a different cable. The first one might not support data transfer.
Wireless Connection: Wi-Fi Direct Setup {#wireless-connection}
If you’re not a fan of dealing with cables in the car, you can go with the wireless connection instead. The developer recommends using Wi-Fi Direct as it doesn’t require an external hotspot or Wi-Fi network.
On the Tablet (Headunit Revived)
-
Make sure both devices have Wi-Fi enabled but disconnected from any network.
-
In the Headunit Revived app, go to Settings.
-
Under Wireless Mode, choose Wireless Helper.
-
Set the Helper Connection Strategy to Wi-Fi Direct (P2P).
-
Hit Save.
-
Go back to the home screen.
-
Take note of the Wi-Fi Direct name that appears at the top of the screen. If it doesn’t show up right away, try relaunching Headunit Revived.
On the Phone (Wireless Helper)
-
Install and open Wi-Fi Helper on your Android phone.
-
Set Connection Mode to Wi-Fi Direct.
-
Enter the tablet’s Wi-Fi Direct name in the Wi-Fi Direct Device Name(s) section.
-
Press Start Android Auto.
-
Wait for Wireless Helper to find your Android tablet.
-
Select Continue to go to Android Auto.
Troubleshooting: If the two devices don’t automatically connect, you might need to go to Settings on each device, find the Wi-Fi Direct option (usually located in the Wi-Fi section), and pair them manually.
Using Android Auto on Your Tablet {#using-android-auto}
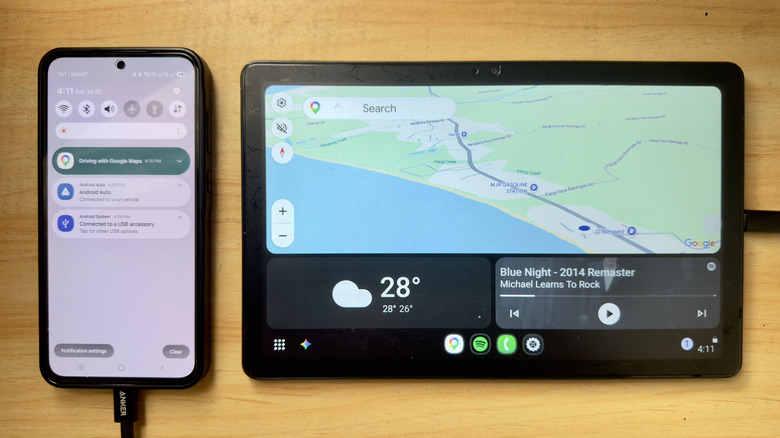
After connecting your phone to your old Android tablet, Android Auto should automatically load on the screen. The interface looks pretty similar to a regular Android Auto head unit, with Google Maps and Spotify already open on the home screen. Depending on your tablet’s display size and the optimized layout, you might also see a weather widget.
What You Can Do
| Action | How To |
|---|---|
| Navigate with Google Maps | Type your destination and navigate. |
| Play music with Spotify | Press play to start listening. |
| Switch navigation apps | Select from the dock (e.g., Maps.me). |
| Open other Android Auto apps | Tap the app drawer icon in the bottom-left corner. |
Exiting Android Auto
-
Wired connection: Unplug your phone from the tablet.
-
Wireless connection: Press the Connected button on the Wireless Helper app.
-
You can also exit Headunit Revived from the tablet’s Notification Panel.
Mounting Your Tablet in the Car {#mounting-your-tablet}
If you decide to mount your tablet-turned-Android Auto receiver in your car, there are several options to choose from:
| Mount Type | Example | Best For |
|---|---|---|
| Cup holder mount | eSamcore Tablet Holder | Easy installation, adjustable viewing angle. |
| Dashboard mount | Apps2Car Tablet Car Mount | Secure placement, easy access. |
| Windshield mount | Apps2Car Tablet Car Mount | Clear view, versatile positioning. |
Choose a mount that suits your car’s interior and your preferred viewing angle.
Frequently Asked Questions {#faq}
What devices are compatible with Headunit Revived?
Headunit Revived works on any Android device running Android 4.1 or later, including Android tablets, phones, and Amazon Fire tablets.
Do I need to root my tablet?
No. Headunit Revived works on unrooted devices.
Can I use an iPhone with Headunit Revived?
No. Headunit Revived is designed for Android Auto, which requires an Android phone. iPhone users would need a different solution like AutoKit with a Carlinkit dongle.
Is the wired or wireless connection better?
Wired is generally more reliable and easier to set up. Wireless is more convenient but may require additional configuration.
How much does Headunit Revived cost?
The app costs $4 on the Google Play Store** and **$4.70 on the Amazon Appstore. You can also download it for free from the project’s GitHub page.
Does Headunit Revived work on Amazon Fire tablets?
Yes. You can install it from the Amazon Appstore for a one-time fee of $4.70.
Can I use Headunit Revived without Google Play Services?
Yes. Headunit Revived can run even without Google Play Services or microG.
Quick Reference Summary {#quick-reference}
| Step | Action |
|---|---|
| 1 | Install Headunit Revived on your old tablet. |
| 2 | Complete the Quick Setup Wizard (screen size, orientation). |
| 3 | Choose wired (USB) or wireless (Wi-Fi Direct) connection. |
| 4 | For wired: connect USB, set USB mode to Transferring files/Android Auto. |
| 5 | For wireless: install Wireless Helper on your phone, pair via Wi-Fi Direct. |
| 6 | Launch Android Auto and start using navigation, music, and more. |
| 7 | Mount the tablet in your car with a suitable holder. |
Final Thoughts {#final-thoughts}
Repurposing an old Android tablet as a DIY Android Auto head unit is a cost-effective and eco-friendly way to bring modern infotainment features to an older car. With Headunit Revived, you get a functional Android Auto receiver without the hefty price tag of a new head unit.
The bottom line: Whether you choose a wired or wireless setup, this project is straightforward, affordable, and gives new life to an old device. So dust off that old tablet, grab a mount, and enjoy navigation, music, and messaging on the road.