

How to Fix the “Insecure Network” Warning on Your iPhone
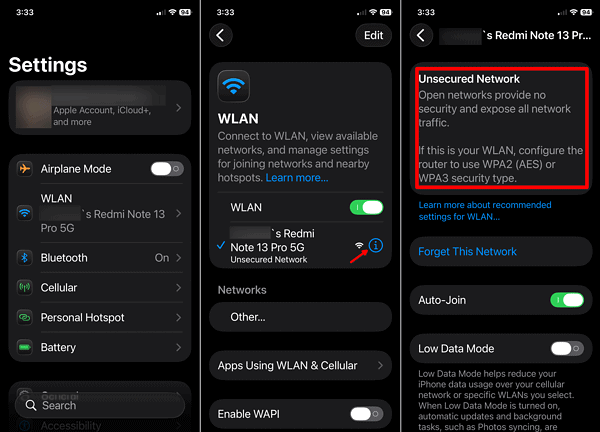
The “Insecure Network” warning on your iPhone indicates that the Wi-Fi network you’re connected to uses weak security, which could expose your data. This guide will help you understand the cause and provide step-by-step solutions to fix it, starting with the simplest checks.
🚨 Understanding the Warning
This alert appears when iOS detects that your Wi-Fi network lacks modern security protocols. Common triggers include:
-
Outdated Encryption: Using old standards like WEP or WPA (not WPA2/WPA3).
-
Open Network: A network with no password.
-
Router Misconfiguration: Incorrect security settings or outdated firmware.
🛠️ Troubleshooting Checklist: Start to Finish
Try these solutions in order for the most efficient fix.
| Step | Solution | When to Try |
|---|---|---|
| 1 | Forget & Reconnect to Network | First step for any transient glitch. Clears cached settings. |
| 2 | Disable VPN / Private Relay | If you use a VPN or iCloud Private Relay. Rules out interference. |
| 3 | Check & Strengthen Router Security | The core fix. Change encryption to WPA2 or WPA3. |
| 4 | Update Router Firmware | If security settings are correct but the warning persists. |
| 5 | Update iOS | Ensures your iPhone has the latest security detection algorithms. |
📝 Detailed Fix Instructions
1. Basic iPhone Fixes
Start with these quick actions on your iPhone.
-
Forget and Rejoin the Network:
-
Go to Settings > Wi-Fi.
-
Tap the “i” icon next to the problematic network.
-
Tap “Forget This Network” and confirm.
-
Re-select the network and enter the password to reconnect.
-
-
Temporarily Disable VPN and Private Relay:
-
For VPN: Go to Settings > VPN and toggle it off.
-
For iCloud Private Relay: Go to Settings > [Your Name] > iCloud > Private Relay and toggle it off.
-
2. Fix the Router’s Security Settings (Most Effective Solution)
This is usually the root cause. You must access your router’s admin panel (usually via a web browser on a connected device).
-
Log into your router. The address (e.g.,
192.168.1.1), username, and password are often on a sticker on the router itself. -
Navigate to the Wireless or Security settings section.
-
Locate the “Security Mode,” “Encryption,” or “Authentication” setting.
-
Change it to WPA2-Personal (AES) or WPA3-Personal. WPA3 is the newest and most secure, but WPA2 has broader compatibility.
-
Set a strong password if you haven’t already.
-
Save settings and restart your router. Then reconnect your iPhone.
3. Update Your Router’s Firmware
Outdated firmware can cause security and compatibility issues.
-
In your router’s admin panel, find the Administration, Tools, or Firmware Update section.
-
Follow the manufacturer’s instructions to check for and install the latest firmware. The router will restart.
4. Update iOS
Ensure your iPhone has the latest security updates.
Go to Settings > General > Software Update and install any available updates.
❓ Frequently Asked Questions (FAQ)
-
Is it safe to use a network with this warning?
Proceed with caution. Your internet traffic could be intercepted by others on the same network. Avoid banking, shopping, or logging into sensitive accounts. -
The warning appears on a public Wi-Fi (cafe, airport). Can I fix it?
No. You cannot change the security settings of a public network. The warning is accurate. Use your cellular data or a trusted VPN for protection if you must use it. -
Why did this warning suddenly appear on my home network?
A recent iOS update may have enabled stricter security checks. Your router’s outdated security protocol (like WPA) may have been acceptable before but is now flagged. -
I’m using WPA2 and still get the warning. Why?
Ensure you selected WPA2-Personal with AES encryption (not TKIP). Also, complete a router reboot and iPhone network forget/reconnect after making the change.
✅ Summary
To permanently resolve the “Insecure Network” warning:
-
Access your router’s settings and change the Wireless Security to WPA2-Personal (AES) or WPA3-Personal.
-
Set a strong password.
-
Update your router’s firmware and restart it.
-
On your iPhone, forget the network and reconnect.
This strengthens your network’s security, protects your data, and removes the iOS warning. If you cannot change the settings (e.g., on a public network), using a reputable VPN is the best way to secure your connection.


